Saturday, January 24, 2009

Top 10 hybrids

Gas-electric hybrids are among the most miserly rides on the road when it comes to fuel economy. But how do they compare to each other?\

Maybe we’re used to them by now: Hybrids silently sliding up behind us in the grocery store parking lot or on the street in front of the pharmacy, the only identification being a slight hum or a green badge on the tailgate. Whether they’ve become commonplace or not, we shouldn’t downplay that hybrid drive systems represent a colossal leap forward in terms of environmentally conscious automotive technology — and there have been only a handful of big jumps in the last century. Like that prehistoric guppy morphing into a landlubber, the addition of electric power is auto evolution in the making. In 2000 just one hybrid was available in the U.S. The 2009 model year has 20 from which to choose. But are all of them created equal?
We decided to put them to the test and wrangled up the 10 most efficient hybrids available in the U.S. We based our list on the Environmental Protection Agency’s fuel economy stats. Incidentally, these ratings have been updated starting with model year 2008. They are now more accurate, taking in real-world factors including cold weather, faster acceleration and air conditioner use. In fact, many drivers now find they get better mileage than what’s printed on the EPA window sticker. Here’s how the hybrids ranked:

Toyota Prius

2009 Toyota Prius (© Toyota Motor Sales, U.S.A.) Click picture to enlarge
Though the Toyota Prius sacrifices performance in the pursuit of fuel-efficiency, its interior is well-built and reasonably comfortable.
Love it or loathe it, the Prius is the most fuel-efficient car you can buy in America. The poster child for the green revolution is also the most popular hybrid in the world, with more than 1 million sold. The EPA ranks the 2009 model at 48/45 mpg (city/hwy). At its heart is Toyota’s Synergy Drive, which debuted in 2003. It is the same technology found in the Toyota Camry and Highlander hybrids, and also is licensed by Nissan for their hybrids, as well as Ford, but to a lesser extent. The manufacturer’s suggested retail price for a 2009 Prius runs from $22,000 to $24,270, depending on trim level.

Related Content
First Drive: 2010 Honda Insight  // First Drive: 2010 Honda Insight  (First Drive: 2010 Honda Insight )First Drive: 2010 Honda Insight Honda introduces America’s lowest-priced hybrid.

2008 Honda Civic Hybrid (© American Honda Motor Co., Inc.) Click picture to enlarge
Honda's fuel-sipping Civic lineup has just been updated — albeit barely — for 2009 with a midcycle enhancement and the addition of two new sedan trim levels.
Honda’s Integrated Motor Assist pairs an i-VTEC engine with an electric motor, bumping the mpg up to 40/45 (city/hwy). With 90.9 cubic feet of passenger space and 10.4 cubic feet of storage, the Civic is slightly less spacious than the Prius. However, the hybrid Civic’s five-star frontal crash rating beats four stars for the Prius. The Civic Hybrid’s base MSRP is $23,550; leather and a nav system will bump you up to $26,750. Federal tax incentives are still available for the Civic Hybrid, but after the end of 2008 they’re gone. Prius incentives are already history.

Nissan Altima Hybrid

2008 Nissan Altima Hybrid (© Rod Hatfield) Click picture to enlarge
The Nissan Altima is largely unchanged for 2009, although the automaker is expanding availability of its gas-electric hybrid model.
Drivers demanding more performance should take a look at Nissan’s Altima Hybrid. With a 40-horsepower electric motor alongside its 2.5-liter 4-cylinder engine, it has the feel of a V6. But at 35/33 mpg (city/hwy), it doesn’t burn gas like one. With a $26,650 MSRP, the Altima is trying to give the hybrid Camry a run for its money, but only in the nine states where it’s available: California, New York, Massachusetts, Connecticut, Vermont, Oregon, Rhode Island, Maine and New Jersey.

Escape/ Tribute/ Mariner Hybrids (2WD)

2009 Ford Escape Hybrid (© Ford Motor Company) Click picture to enlarge
The Ford Escape, Mazda Tribute and Mercury Mariner Hybrids are basically all the same under the sheet-metal facade. Talk about two too many.
Although Ford claims its Escape Hybrid is “the most fuel-efficient SUV on the planet,” it is actually in a three-way tie with two other compact SUVs: the Mazda Tribute Hybrid and Mercury Mariner Hybrid. We’ll cover the triplets together, since they bear the same vital stats. The 2009 models of these three compact SUVs test at 34/31 mpg (city/hwy) in their front-wheel-drive models. However, all three compact hybrid SUVs drop to 29/27 mpg when adding four-wheel drive. All three carry the same 2.4-liter 4-cylinder engine that is paired with an electric motor and nickel-metal hydride battery pack. While these compact SUVs offer only a bit more passenger space than a Prius, there is much more cargo space to be found behind the rear seats.

Toyota Camry Hybrid

2008 Toyota Camry Hybrid Click picture to enlarge
Unchanged for 2009, the Toyota Camry is soft on sport and excitement, but offers good to great levels of comfort, convenience and options.
One of the most popular cars on the road — somewhat sexier after its 2007 redesign — the Camry Hybrid is also one of the most sought-after hybrids. A 105-kilowatt electric motor and 4-cylinder engine give this car considerably more punch in the pants than the Prius, and fuel economy of 33/34 mpg (city/hwy). The Camry also offers more cubic footage for passengers than its Prius sibling. A 2009 Camry Hybrid carries a base MSRP of $26,150.
its size to go gas-electric, the Highlander Hybrid treads the line between power and efficiency. A 3.3-liter V6 offers a net output of 270 horsepower. Even with standard 4WD, the hybrid Highlander rates at 27/25 mpg (city/hwy), with an MSRP ranging between $34,700 and $41,020.

Chevrolet Malibu Hybrid

2008 Chevrolet Malibu Hybrid Click picture to enlarge
Nicely designed inside and out, with solid overall performance and an attention to detail, the Chevy Malibu Hybrid is an example of what GM can do when motivated.
The hybrid incarnation of the Malibu is part of a growing family of American-made fuel-sippers. Driving a hybrid Malibu will feel different from a Prius or Camry. Aside from the aesthetics, Chevy’s gas-electric powertrain is what in industry jargon is called a “mild hybrid.” The car will get a burst from the electric motor during acceleration, and the battery will recharge during coasting and braking. The gas motor will also shut off when the car is at a standstill. But unable to run on electric power alone, this Malibu gets 26/34 mpg (city/hwy), a small improvement over the 22/33 mpg of the non-hybrid Malibu.
Related Content
First Drive: 2010 Honda Insight  // First Drive: 2010 Honda Insight  (First Drive: 2010 Honda Insight )First Drive: 2010 Honda Insight Honda introduces America’s lowest-priced hybrid.

2008 Saturn Aura Hybrid Click picture to enlarge
The Saturn Aura Hybrid possesses an attractive design inside and out, a quiet cabin, a comfortable ride and top safety scores, but fuel economy isn't what it could be.
Packing the same “mild hybrid” system and 4-speed automatic gearbox as the Malibu, Saturn’s 5-seat hybrid Aura offers the same 26/34 mpg (city/hwy). Both the Aura and Vue are part of Saturn’s growing family of hybrids, which was dubbed Green Line until the label was dropped this year. Saturn is claiming “very limited availability” for the Aura, but if you can find one you’ll meet an MSRP of $26,685.

Saturn Vue Hybrid

2009 Saturn Vue Hybrid (© General Motors) Click picture to enlarge
GM claims fuel economy for the Saturn Vue 2 Mode will be 50 percent better than that of the gas-only V6, and have a range of more than 500 miles.
The other hybrid feather in Saturn’s cap is the Vue, the first GM model to go hybrid back in 2006. A 2009 Vue Hybrid pulls in 25 mpg driving in the city, 32 mpg on the highway. The 2009 model year was supposed to see the Vue available with GM’s more advanced 2-Mode hybrid system—the same used in the Tahoe and Yukon hybrids. But financial trouble has delayed a 2-Mode Vue until the first quarter of 2009.

Lexus GS 450h

2008 Lexus GS 450h (© Toyota Motor Sales, U.S.A.) Click picture to enlarge
Lexus claims that the hybrid system in the GS 450h will perform like a 4.5-liter V8, producing substantially more than 300 horsepower and doing zero to 60 mph in less than six seconds.
Tuned for exhilaration rather than efficiency, the 450h packs a V6 alongside its Lexus Hybrid Drive. Lexus claims the car can leap from zero to 60 in 5.2 seconds, making it Lexus’ fastest hybrid. But it comes at a price, both in mpg and dollars. This rear-wheel-drive sport sedan tests at 22/25 mpg (city/hwy), and the MSRP starts at $56,400.

Sunday, January 11, 2009

Changing spark plugs in a Nissan Maxima

Changing the spark plugs on a 2002-2003 Maxima is not something you should have to do until around 100,000 miles. The stock plugs are platinum tipped and should last a very long time. Replacement of the plugs is something that Nissan recommends you "see your dealer" to do. The reason is that in order to replace the 3 plugs in the rear cylinder bank, the intake manifold upper and lower collectors have to be completely removed from the vehicle. To do this requires skill beyond the average Sunday mechanic, since there are many vacuum, electrical and coolant lines that have to come off in order to perform the job.
My Nissan had slightly over 18,000 miles on it when I did the job, and it did not really need new plugs. The reason I ended up doing this job was because I strongly suspected one or more of my ignition coils were faulty, and try as I might I could not get Nissan to admit the problem or come up with a solution. I called Courtesy Nissan, ordered a set of ignition coils and plugs, and set about doing the job myself. I replaced all 6 ignition coils, and doing the spark plugs as well was simply for the sake of completeness.
I documented the entire process with pictures and text so that if there is anyone out there who wants to do the same, perhaps they will not be quite as intimidated as if they were going in cold. The job is not simple, and took me about 3.5 hours, but I did take a lunch break, and was also documenting the process with a digital camera.
Cost of the job was also not cheap - a set of 6 ignition coils from Courtesy Nissan cost me $333.48. The required gasket is another $18.40. The plugs themselves will run you $11.00 each. If all you really need to do is change your plugs, obviously you don't need to buy coils, so then all you would need would be 6 plugs and the gasket. Do the job yourself and you will save quite a fortune in labor, as this job performed by the dealer would be many hundreds of dollars.
1
Here is the nice clean engine bay before going in with the chainsaw. If you have a front strut brace, as I did, it is probably not necessary to remove it, but I did simply to make it a little easier to lift the collector out. It only takes a minute or two anyway.
1
This pic still shows the strut brace in place (I removed it later). First step is to remove the 4 allen bolts securing the engine cover, and take it off.
3
A view near the firewall. The test is if you can reach and loosen these two bolts then you can do the rest of the job. It requires a 12mm socket with a long handle.
4
My method of doing this job will show you how it can be done without disconnecting so many vacuum lines, as I have seen others do. All you need to do is take a few parts off first so you can reach the bolts that attach the collector to the engine. Leave the electrical connector off, but put the valve back on.
5
Same idea with the vacuum tank. Take it off only so you can reach the attachment bolts. Then put it, and the VIAS control solenoid valve back on.
6
Once you get these 3 bolts, and 2 nuts off, you can go ahead and put the VIAS and vacuum tanks back on the collector.
7
Don't take these off! No need to. You'll see why later.
8
Two vacuum lines which need to come off. Slide the compression clamp down, and twist the hose off. Easy.
9
These electrical connectors need to be popped off. Be careful you don't break them.
10
You also have to release and then slide the lower half off their brass fitting, or you won't be able to lift the collector assembly off.
11
Again, another picture before going in with the chainsaw.
12
Loosen the screw holding the rubber connector to the intake. Leave the other side alone. It will stay.
13
Unplug your "drive by wire" electrical connector, for the electronic throttle.
14
Pop out the two plastic harness holders.
15
Get the wire out of the way.
16
Remove this plug, take the 10mm bolt out, then put the plug back in.
17
Make room.....
18
This was a tough picture to take. A little trick here - disconnect hoses 1 and 2 right at the area pointed to by the yellow line. Be prepared for a little bit of coolant to spill out when you disconnect hose #2.
Important - disconnect hose #3, not where you see the yellow line here, but at the other end of the hose. You will never in a million years reach this hose where the arrow is pointing, but you can reach it at the other end.


Slide the compression clamps down before you try to take these hoses off.
19
Just another view at lines #1 and #2.
20
Removing hose #1.
21
After all of the hoses and electrical connectors come off, you can lift the entire intake collector assembly up and out. This is what the engine bay looks like with the collector assembly off.
22
Another view of the engine bay.
23
The collector assembly is rather large, but it is actually very light. I took the opportunity to clean mine up with some Gumout intake cleaner. Note that hose #3 is still attached to the collector!
24
Note how all of the assemblies remain attached when the collector comes off.
25
Here is a side view.
26
The procedure to remove the coils is the same for the front bank as it is for the rear. Just take the 10mm bolt out, unplug the connector and pull it right out.
27
This is what one coil looks like.
28
Use a spark plug wrench to remove each plug.

29

Nissan recommends you change this gasket any time the collector comes off. It is an expensive gasket, but why risk it? Buy a new one.
I do not show re-assembly here, but just follow these steps in reverse order. I hope I have de-mystified this process a little bit, and that you might be inspired to do this job yourself when the time comes. Good Luck, and you can do it.

Saturday, October 25, 2008

What is the best fuel for my car

As we all know gas prices are at an all time high and rising! So, will premium gas give you better fuel mileage? Will premium fuel give you better performance? Most people that drive cars today don't really quite understand the difference between high octane and lower octane gas at the pump. Let's talk about fuel and what the octane rating means and maybe we can answer some of these questions.
Auto Icon
It's a false misconception that higher octane fuel will automatically increase fuel mileage and performance. In reality, it often does neither.
The octane rating of fuel determines how fast the fuel ignites and burns inside the engine. In older non-computerized cars fuel octane was very critical in fuel economy and the performance of the engine. Today, with modern technology and computerized fuel delivery systems your car is designed to run on just about any grade of fuel. Your cars computer system will automatically adjust ignition timing and other critical adjustments through a complex system of sensors to give you optimum performance and fuel economy on any grade of fuel.
But my owners manual says to use 91 octane of higher? Yes, some manufacturers do specify higher octane fuel, but using a lower octane fuel will not damage your engine or void your warranty. They claim that performance will be lost on lower octane fuel but the average driver will not notice any difference in performance or fuel mileage from 87 vs. 93 octane.
The Bottom Line? Unless you are driving a very high performance car don't wast your money on high octane fuel, save your hard-earned money and use the lower octane fuel!

Understanding your heat and A/C

Heat & A/C Systems (HVAC) Explained

Your vehicles heating and air conditioning system can be very confusing and involve complicated diagnostics and repair procedures. To help in your repair make sure you have a quality repair manual handy. If you plan on doing any A/C work on your own vehicle, ask The Wright Import to help you through the repair. We will be glad to take you step by step.

Auto Icon

Without the heating and air conditioning systems in today's modern vehicles, we would all be miserable driving to our destinations. We take for granted the heat that keeps us warm in the winter months, and the cool air that refreshes in the summer time. Let's take a look at how both systems work to keep us comfortable all year round.

The heater in your car is basically a smaller version of your cooling systems radiator. Hot engine coolant is circulated through a small radiator, often times called a heater core. A fan is positioned in front of the heater core to blow cold outside air over the fins. As this air travels over the heater core, it heats up and becomes the hot air which blows out your heater vents.

Like your engines cooling system radiator, the heater core can suffer some of the same issues. If the heater core becomes clogged with rust or sludge, you will no longer have heat. Also leaks can cause a cabin full of white steam and really mess up your windows. If you smell the sweet aroma of coolant when your heater is on, chances are, you have a small leak in the heater core. Often times the heater core is buried under the dashboard, and replacing it is a major job.

The air conditioning system in your car is comprised of a compressor, condenser, expansion valve and evaporator. If you have ever used a can of compressed air to clean computer components, you will know that the bottle gets very cold in a short amount of time. This is due to the rapid expansion of the compressed gas. The same thing happens in your car's air conditioning system. Refrigerant (AKA Freon) is compressed in the compressor and turns into a hot gas. In the condenser, this hot gas is cooled to a liquid state and travels to the expansion valve. As the Freon goes through the expansion valve it returns to a low-pressure gas and rapidly cools in the evaporator. A fan blows over the evaporator and cools the air that eventually blows out your vents.

Common Problems:

1) From time to time the A/C system needs to be recharged to bring it back up to maximum efficiency. Sometimes a leak may cause loss of refrigerant and will need to be fixed before refilling. It's difficult to tell if a leak is present without specific test equipment so leave it up to a professional.

2) In recent years, the EPA has phased out the use of R-12 Freon in all refrigeration systems and R-134 has become the new standard. If you have an older system with R-12 you may need to retrofit your system to handle the new R-134 refrigerant. Sometimes seals, hoses and even the compressor need to be changed. The problem arises when the older seals and hoses are not compatible with the new oils found in the R-134.

3) Corrosion will cause the heater core (secondary radiator) to leak. This will manifest itself by leaving steam into the passenger compartment and fogging your windows. You will know there is a leak by the sweet smell coming from your vents. Unfortunately changing the heater core is usually not the easiest job in the world as engineers tend to squeeze them into some pretty tight spaces under the dash.

The HVAC system is one of the most least understood systems in your car, you need a good repair manual to guide you in the right direction. The Wright Import can research your questions and give you the answers you need for your A/C problems.

Understand your automatic transmission

The modern automatic transmission, (when to flush and when not to flush) is one of the most complicated mechanical component in today's automobile. Automatic transmissions contain mechanical systems, hydraulic systems, electrical systems and computer controls, all working together in perfect harmony until there occurs a problem. It is necessary to understand the concepts behind what goes on inside these technological marvels and what goes into repairing them when they fail.

How does a Transmission work?
The transmission is a device that is connected to the back of the engine and sends the power from the engine to the drive wheels. An automobile engine runs at its best at a certain RPM (Revolutions Per Minute) range and it is the transmission's job to make sure that the power is delivered to the wheels while keeping the engine within that range. It does this through various gear combinations. In first gear, the engine turns much faster in relation to the drive wheels, while in high gear the engine is loafing even though the car may be going in excess of 70 MPH.
      

In addition to the various forward gears, a transmission also has a neutral position which disconnects the engine from the drive wheels, and reverse, which causes the drive wheels to turn in the opposite direction allowing you to back up. Finally, there is the Park position. In this position, a latch mechanism is inserted into a slot in the output shaft to lock the drive wheels and keep them from turning, thereby preventing the vehicle from rolling.
There are two basic types of automatic transmissions based on whether the vehicle is rear wheel drive or front wheel drive.
1) On a rear wheel drive car, the transmission is usually mounted to the back of the engine and is located under the hump in the center of the floorboard alongside the gas pedal position. A drive shaft connects the rear of the transmission to the final drive which is located in the rear axle and is used to send power to the rear wheels. Power flow on this system is simple and straight forward going from the engine, through the torque converter, then through the transmission and drive shaft until it reaches the final drive where it is split and sent to the two rear wheels.

2) On a front wheel drive car, the transmission is usually combined with the final drive to form what is called a transaxle. The engine on a front wheel drive car is usually mounted sideways in the car with the transaxle tucked under it on the side of the engine facing the rear of the car. Front axles are connected directly to the transaxle and provide power to the front wheels. In this example, power flows from the engine, through the torque converter to a large chain that sends the power through a 180 degree turn to the transmission that is along side the engine. From there, the power is routed through the transmission to the final drive where it is split and sent to the two front wheels through the drive axles.


Spotting Problems before they get Worse

Watch for leaks or stains under the car:
If there is a persistent red oil leak that you are sure is coming from your car, you should have your shop check to see if it is coming from your transmission or possibly from your power steering system (some power steering systems also use transmission fluid and leaks can appear on the ground in roughly the same areas as transmission leaks.) If all you see is a few drops on the ground, you may be able to postpone repairs as long as you check your fluid level often (but check with your technician to be sure.) If transmission fluid levels go down below minimum levels serious transmission damage can occur (the same advice goes for power steering leaks as well.)


Check fluid for color and odor:
Most manufacturers require that you check transmission fluid levels when the vehicle is running and on level ground. Pull the transmission dipstick out and check the fluid for color and odor. Transmission fluid is a transparent red oil that looks something like cherry cough syrup. If the fluid is cloudy or muddy, or it has a burned odor, you should have it checked by your technician who will most likely advise you to have a transmission drain and refill or a transmission flush.


Be sensitive to new noises, vibrations, and shift behavior
A modern transmission should shift smoothly and quietly under light acceleration. Heavier acceleration should produce firmer shifts at higher speeds. If shift points are erratic or you hear noises when shifting, you should have it checked out immediately. Whining noises coming from the floorboard are also a cause for concern. If caught early, many problems can be resolved without costly transmission overhauls. Even if you feel that you can't afford repairs at this time, you should at least have it checked. The technician may be able to give you some hints on what to do and not do to prolong the transmission life until you can afford the repair.

Saturday, October 18, 2008

When do I need a tune up

Mica spark plug (Manual of Driving and Mainten...Image via WikipediaThe engine tune-up is fast becoming a thing of the past. Many customers still go to their repair shop with a problem and say - "Maybe I just need a good tune-up." Back in the day a tune-up consisted of changing the spark plugs and plug wires, replacing the distributor cap and rotor, points and condenser and setting the ignition timing.
The tune-up was a very vital maintenance item that was needed often to keep the engine running properly. Today’s engines do not use most of the parts that use to be replaced in the basic tune-up. Spark plugs have become well advanced and usually last almost 100,000 miles. The distributor has been replaced by a non-distributor ignition system that eliminates the distributor totally. This means that the cap and rotor, points and condenser have also been eliminated.
Ignition timing is no longer adjustable manually. The vehicle’s computer keeps the ignition timing adjusted properly at all times for proper engine operation and performance.

So back to the question - "Do I need a tune-up?"

Spark plugs do need to be replaced periodically and spark plugs do go bad sometimes and cause engine misfires and do need to be replaced when this happens. All of the spark plugs need to be replaced at the same time, so if one goes bad then replace them all. It is also best to replace the plug wires when the plugs are replaced for maximum performance. Some of the most common types of tune ups will consist of:

Some of the most common tune ups will consist of the following:
There are many different areas that need to be maintained on a regular basis to keep your engine running properly. Lets look at these areas and explain what and why these items need to be serviced.
Auto Icon
Air Filter - Replace the air filter about every 15,000 miles for normal driving conditions. A dirty air filter will not cause the engine to run bad, unless it is completely plugged. A dirty filter can cause reduced fuel economy and higher exhaust emission gases.

Fuel Filter -Fuel filters become clogged with dirt and debris during normal operation and should be replaced to increase performance, extend fuel pump life, and aid in fuel economy.

Auto Icon 
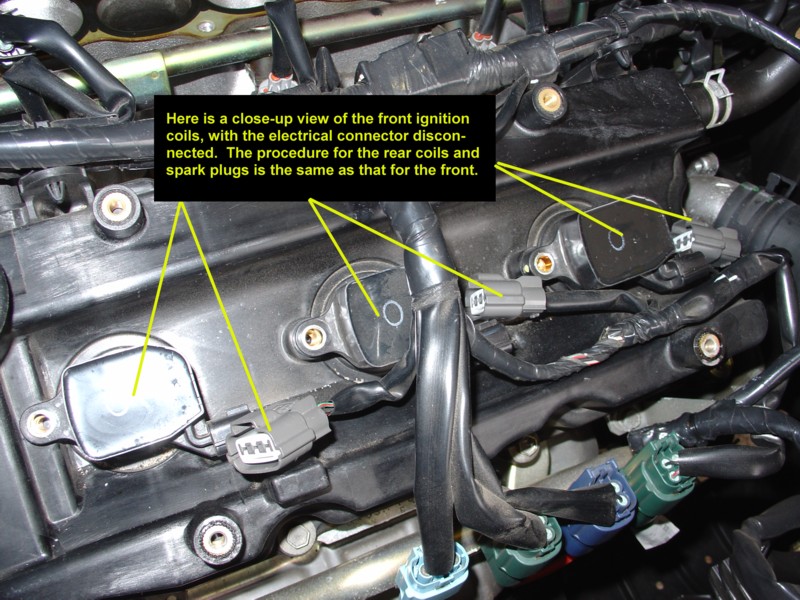
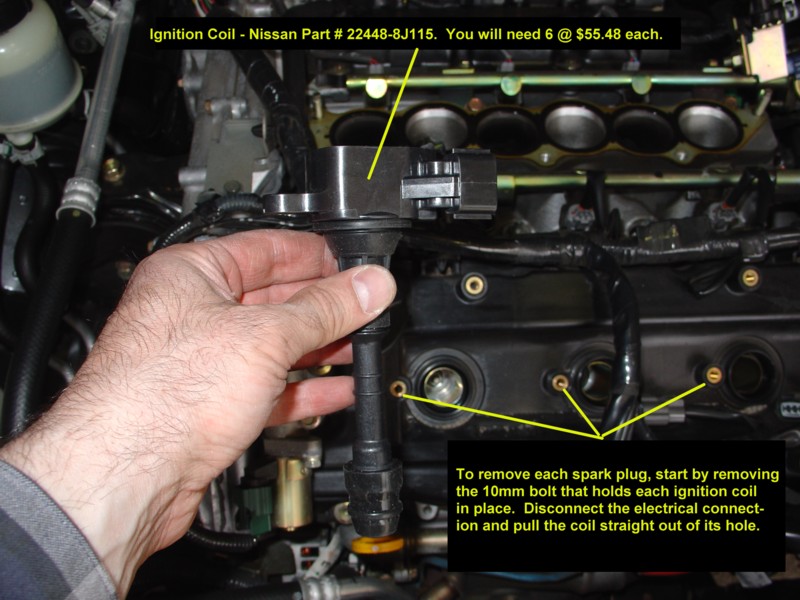
Spark Plugs - Worn or faulty spark plugs can cause misfire, poor fuel mileage, loss of power, and slow or extended starting time.

Spark Plug Wires - Spark plug wires should be replaced when replacing spark plugs to get maximum performance and life expectancy of spark plugs.

Distributor Cap/Ignition Rotor - These items should be inspected/replaced when replacing spark plugs and spark plug wires, or when a "major tune-up" is called for. The distributor cap is where the other end of the spark plug wires connects to, and the ignition rotor in underneath the distributor cap. Some newer model vehicles do not have a distributor at all. These cars are designed with Distributor less Ignition Systems (DIS.), and therefore do not have these parts. All of these items need to be checked every 15,000 to 30,000 miles. Check with The Wright Import for the proper maintenance schedule for you car or truck.
For a copy of your vehicles regular scheduled maintenance, please go to our forums and make a request. we will be happy to provide you with one for free.
Enhanced by Zemanta

Thursday, October 16, 2008

My check engine light is on

So, what does this mean? Is my car going to blow up! Is it going to be expensive to repair? Let's look at what the check engine light means and how it works.

All modern vehicles have a computer or ECM (Electronic Control Module) that controls the engine operation. The main purpose of the ECM is to keep the engine running at top efficiency with the lowest possible emissions. With today's strictest emission regulations it is not very easy to achieve - the engine needs to be constantly and precisely adjusted according to various conditions such as speed, load, engine temperature, gasoline quality, ambient air temperature, road conditions, etc.

Today's cars have much more electronics than in early days - there is a large number of various sensors and other electronic devices that help the engine computer or ECM to monitor all vehicle emission-related systems. When the computer senses that there is a problem with any emission-related system or component, it stores the trouble code(s) in the memory and lights up the "Check Engine" or "Service Engine Soon" light to tell you that there is a problem and your car needs to be looked at.

The technician at the dealership or a garage then will hook up the scanner to the car's computer and retrieve the stored code(s). Then he will look it up in the service manual provided by the car manufacturer. The service manual contains the list of possible codes (about a few hundred) and describes what each code means and what needs to be tested. The code itself doesn't tell exactly what component is defective - it only says what engine parameter is out of normal range. The technician will have to perform further testing to pinpoint defective part. Remember that any parts store will will scan your vehicle for codes, but they are usually unable to identify the problem and you will have to take the codes to a service or repair shop for further diagnostics.


So, Just hook my car up to the computer!

This is a very common statement made by customers with any type of problem from a check engine light on to the rattle in back seat! They all think there is a magic computer that tells the mechanic exactly what is wrong with the car!

This is far from the way it works. First of all, the handheld scanner only aids in diagnosing emission related and electrical concerns, including transmissions and body control functions.

Most repair shops will charge a diagnostic charge (usually $50 to $100 dollars) to scan test your cars computer system and check for codes in the system.

Some problems that will turn on the check engine light can be as simple as a loose gas cap or a major problem such as an engine misfire or a slipping transmission.

Many places sell code readers so you can scan your cars computer yourself, but by the time you spend the money for the scanner you could have it scanned by a professional and have it repaired at the same time. Most repair shops will not just replace a part because you tell them its bad, they will want to charge you to complete their own diagnosis. So unless you are a skilled mechanic I don't recommed wasting your money on a code reader.

Always have your vehicle checked anytime your check engine light comes on, becasue even minor problems can turn into major problems


What makes the check engine light come on?

There are many different things that can cause your check engine light to come on. If your car's OBDII system is functioning properly, the CHECK ENGINE or SERVICE ENGINE SOON light should flash briefly when you turn your car's ignition key to the on position. After the brief flash, the light should go out and remain off while you are driving.

A glowing CHECK ENGINE or SERVICE ENGINE SOON light alerts you to problems in your car's onboard diagnostic system that should be checked out as soon as possible. There's no reason to panic and in many cases, you won't notice any difference in vehicle performance.

One of the most common problems with check engine lights on today's cars is a LOOSE or uninstalled gas cap! Yes, that's right your gas cap.

First, check the gas cap to make sure it was not left loose after refueling. Sometimes, this can trigger the light. Most OBDII-equipped vehicles have a gas cap that simply snaps in place, when turned to the right. Some early OBDII-equipped vehicles have threaded caps. On these, just turn the cap to the right until it begins to click. If the gas cap was loose, the light should go out after a few short trips.

If the gas cap is not the problem and the light remains on steady, have the system checked as soon as possible. A light that flashes requires more prompt attention, indicating a more severe condition that must be checked immediately to prevent damage to the catalytic converter. When you experience a flashing light, minimize driving at high speeds or under heavy loads. When scheduling service, make sure the shop that diagnoses your car has technicians who are properly trained and certified for OBDII diagnosis and repair.

Another common problem is filling your gas tank up with the key turned to the on position. This is very easy to do today with the introduction of the DVD player in alot of today's cars, trucks, and vans. Mom and Dad pull up to the gas station turn off the engine and then turn the key back on so the kids can watch their movie. This can, but not always turn the check engine light on, so be on the safe side and always fill up with the key in the off position.

Engine Control Sensors

Sensors measure a variety of operating parameters that help to reduce emissions and also serve functions for the engine, transmission and other systems. These sensors generally include the manifold air temperature sensor, coolant temperature sensor, manifold absolute pressure sensor, airflow sensor, throttle position sensor, vehicle speed sensor and oxygen sensors.

All of these sensors provide critical operating information to the vehicle's powertrain control module, the onboard computer that compares the signals from the sensors to programmed values. Based on the signals, the computer then issues commands to various output devices to control the engine and transmission, along with reducing emissions. 1996 and newer vehicles are equipped with second-generation onboard diagnostics (OBDII) systems that put special emphasis on sensor values and emissions.

Sensors do not require regular maintenance or adjustments. Regardless of what a specific sensor measures, all operate within a range of normal values. If a sensor provides a signal outside the normal range long enough, the powertrain control module will set a trouble code, which will usually trigger the SERVICE ENGINE SOON or CHECK ENGINE light.

Remember: here at The Wright Import in Cumming,Georgia we are always available to serve you. Come by or call anytime.

The Wright Import Service Center

(770) 888-0100
2636 Business Dr, Cumming, GA 30040 Map it | Get directions Cross Streets: Near the intersection of Business Dr and GA-20
www.freewebs.com...

Monday, October 6, 2008

Changing your oil

If the thought of performing your own oil sends chills up and down your spine, just relax. You can tackle your own oil change, saving both time and money. There’s no need to wait in line at your local service station and no cause to pay someone for labor. Just put your game face on, gather a few tools, and tackle it on your own.
Start your oil change by gathering several items. You’ll need motor oil - secure about four to five quarts. You’ll also need a new FRAM oil filter, we recommend FRAM oil filters for all vehicles, old rags, a funnel, an oil-drain pan, a box wrench, and an oil-filter wrench. You may or may not need a car jack to perform your oil change. This depends on how close the bottom of your car is to the ground.
Let your engine cool off and locate the oil drain plug. If you have trouble finding your oil drain plug, refer to your vehicle manuals. Use a box wrench to remove the plug and let the oil drain into a pan. Once the oil is drained completely, replace the drain plug.
For the next step of your oil change, you’ll need to remove the old oil filter. Put the catch pan under it. Remove the FRAM filter with an adjustable oil-filter wrench and a counter-clockwise motion. Expect to get some oil on your hands; an oil change is a dirty job. Take one of your old rags and wipe the filter-mount area, checking to make sure the old filter’s seal isn’t stuck on the engine.
Take some of your new motor oil and use it to coat the rubber seal of your new oil filter. Don’t put too much on; you only need a very light coating. Install the new FRAM oil filter by hand. Typically, an oil-filter wrench is not necessary for this step. Keep it handy, however, just in case tightening by hand fails to do the job.
Now it’s time to install new oil. For this part of the oil change, you’ll need to find and remove the oil-filler cap. Look for it on top of the engine; refer to your car manual if you have difficulty finding it. Put the funnel in the exposed opening and pour the new oil into the funnel. Be sure to refer to your car manual to determine how much oil you’ll need to add.
After adding the right amount of oil, replace the oil-filler cap, turn you car on, and run your engine for a minute. Check to make certain the oil-warning light doesn’t stay on and look under the car to make sure oil isn’t leaking. Finally, use the oil dipstick to check the oil level. Use rags to wipe away excess oil; newspapers are good for this as well. Congratulate yourself, as you’ve just successfully completed your oil change
When changing oil, we recommend using FRAM oil filters FRAM ®Extra Guard®

Advanced Engine Protection
Uses cellulose and synthetic glass blended media to provide 3X MORE engine protection than the average of leading economy oil filters1
95% Dirt Trapping Efficiency
Advanced Oil Filter Media Gives FRAM The Advantage

With an ideal balance of dirt-trapping efficiency and dirt-holding capacity, every FRAM oil filter uses a special blend of fibers and resin providing a proprietary filter media that delivers excellent engine protection.
The most commonly used filter media is cellulose, which is a natural material that presents a random and irregular field of fibers to the oil. By itself, it can only deliver about 80% dirt-trapping efficiency.
FRAM OIL FILTERS
By adding microscopic synthetic fibers to FRAM  oil filters, small windows are created that trap the smaller dirt particles without affecting the flow of oil. Blending synthetic fibers with cellulose increases a filter’s dirt-trapping efficiency and its dirt-holding capacity for higher levels of engine protection and longer filter life.