If you want to make some minor automotive repairs your self, and save some money, then you have come to the right place. We want to help you any way we can. Every thing you need to know about your vehicle's brakes, o2 sensors
, fuel injection, fuel economy and engine codes and so much more. We will be glad to answer any questions that you may have so please feel free to post a question in our comment section. We are a brick and mortar automotive repair center located in Cumming, Georgia. The Wright Import has been in business for over 12 years. We service all imports. Nissan, Toyota, BMW, Mercedes, Volvo, Volkswagen and Subaru. Our master technicians will be glad to answer any questions you may have. let us help you with any questions you may have about your o2 sensors
or oxygen sensor, brakes, engine or maintenance issues that you may have. If you can not figure it out your self, we are here to help.
How Does the oxygen or o2 sensor work
How do I know if my alignment is out
My check engine light is on
My maintenance light is on
When should I change my timing belt
How does the ECM work
How to change my own spark plugs
Change My own brakes
Fuel economy
How to get better MPG
Regular vehicle maintenance, best cure
When should I flush my transmission
When should I tune up my car
Does fuel injection cleaning really work?
Heat and A/C
Change my own oil
Step by step window regulator replacement
Thursday, April 23, 2009
Saturday, April 18, 2009
Volkswagen maintenance schedule
If you suspect you may have some of these issues, or just want us to take a look for your peace of mind, and call us at The Wright Import Cumming Georgia at 770-888-0100 to schedule an appointment!
After years of working on Volkswagen's, we have begun to see common problems and maintenance concerns such as the dreaded "check engine or maintenance light" Whisch usually means some type of emission failure but it can also lead to a host of problems, and these issues need to be addressed on nearly every middle-aged Volkswagen. Most Volkswagens have certain areas that need to be inspected regularly, and prospective owners should always have a pre-purchase inspection done to verify the condition of these items.
In these lists, you will find items that should have been replaced or at least inspected by 75k-100k miles. Some are model specific, and will be noted as such.
Steering shimmy
Clunk during steering
Car drifts to one side
This is usually a sign of bad tie rod ends. The boots have a tendency to tear resulting in improper lubrication of the tie rod ball joint. This leads to long term tie rod end failure. And you will usually need an alignment after any of of these repairs are made
Diving under braking and acceleration

Excessive body lean and during cornering
Bouncy and uncomfortable ride
Factory Volkswagen shocks work great for about 30k. By 60k they are completely shot. Most folks who have been driving their cars since new hardly notice the deterioration as it is gradual. Symptoms include:Diving under braking and acceleration, excessive lean and suspension compression during cornering. Bouncy and uncomfortable ride. Shocks and struts may visibly leak shock oil. When replacing shocks and struts, keep in mind it is a great time to install lowering springs or freshen up other areas of the suspension. You will be amazed at the difference a good set of shocks can make in both comfort and performance!
Oil smell while driving

Oil drips on driveway/garage
Engine runs rough
Prevalent on all Volkswagen's, a burning oil smell could indicate a leaky valve cover gasket. If the condition continues unchecked, oil can seep into the spark plug holes and damage the ignition coils, resulting in costly replacement. Replacement of this inexpensive gasket is a good idea when changing sparkplugs as the coil packs will already be out.
Coolant smell while driving

Loss of coolant
Excessive temperature gains
Volkswagen coolant reservoirs have a large tendency to leak at the seams. This is a very common problem and a relatively quick fix. However if this goes un-repaired it can result in very costly engine repairs including thermostat, water pump, and even head gasket repairs.
Trip display on dash loses clarity

Volkswagen trip displays can occasionally lose pixels and LEDs. This may result in the need to replace the gauge panel. However this repair does not cause any major issues and usually goes unnoticed.
Mercedes maintenance schedule
If you suspect you may have some of these issues, or just want us to take a look for your peace of mind, and call us at The Wright Import, Cumming Georgia at 770-888-0100 to schedule an appointment!
After years of working on the Mercedes Benz, we have begun to see common problems and maintenance concerns that need to be addressed on nearly every middle-aged Mercedes Benz. Most Mercedes Benzs have certain areas that need to be inspected regularly, and prospective owners should always have a pre-purchase inspection done to verify the condition of these items.
In these lists, you will find items that should have been replaced or at least inspected by 75k-100k miles. Some are model specific, and will be noted as such.
Rubbery feel during steering

Vibration experienced while braking at freeway speeds
These are common symptoms of cracked or torn lower control arm bushings. This is usually fixed by replacing the bushing. Some owners may want to change the bushings with M3 or poly-urethane bushings for increased performance with little change in ride comfort.
Steering shimmy
Clunk during steering
Car drifts to one side
This is usually a sign of bad tie rod ends. The boots have a tendency to tear resulting in improper lubrication of the tie rod ball joint. This leads to long term tie rod end failure.
Diving under braking and acceleration

Excessive body lean and during cornering
Bouncy and uncomfortable ride
Factory Mercedes Benz shocks work great for about 30k. By 60k they are completely shot. Most folks who have been driving their cars since new hardly notice the deterioration as it is gradual. Symptoms include:Diving under braking and acceleration, excessive lean and suspension compression during cornering. Bouncy and uncomfortable ride. Shocks and struts may visibly leak shock oil. When replacing shocks and struts, keep in mind it is a great time to install lowering springs or freshen up other areas of the suspension. You will be amazed at the difference a good set of shocks can make in both comfort and performance!
Rough acceleration

Jerky shifting
Check engine light
This is usually a sign of a faulty Mass Airflow Meter. It calculates the mass of the air entering the cylinders and then tells the computer how much fuel to inject to ensure proper combustion. If the sensor is reading faulty then the end result is a bad mixture of air/fuel. This also sometimes triggers a check engine light.
Loud clunk or bang when shifting or during deceleration/acceleration

A Flex Disc will result in a perceivable 'drive-train elasticity.' Acceleration will be preceded with a loud clunk as the flex disc bolts bind together.
Tail light bulb consistently burning out

Tail light still doesnt light up after changing bulb
It is very common for the contacts on the tail light housing to corrode and or burn. This results in a short or incomplete circuit for your exterior lighting. The only fix for this is to replace the entire rear tail light housing and socket.
Door locks do not automatically lock

Door locks act weird after oil change on diesel
On older Mercedes Benz vehicles the door locks are actuated by vacuum. If the system has a vacuum leak then the door locks will fail to work automatically and must be locked by hand. It is very common for these vacuum lines to be pulled off during an oil change on a diesel due to the location of the oil filter. Fortunately this is an in-expensive fix.
Car is hard to start

Car does not start but if you sit and wait it eventually starts
You drive to the store, and go in, come out and the car cranks, but will not start. You let the car sit for a while and the car starts up. This could very well be your Crankshaft position sensor.
Car misfires/backfires

Runs rough under idle
Runs rough under load
Vehicle "coughs" or stutters often
This is usually bad ignition coils. Unlike many domestic vehicles, Mercedes Benz utilizes an ignition coil per cylinder system rather then a distributor. If one or more coil goes bad it causes rough running conditions. Usually ignition coils go bad due to faulty valve cover gaskets.
Fuel smell in vehicle
Fuel leak by right rear tire
The rubber fuel lines from your fuel pump to your fuel filter commonly dry rot. The lines will harden and crack under long periods of time, especially if the car is not driven very often. Thankfully this is a cheap and quick repair.
Power windows no longer function

The window switches on the center console were badly places by the designers of these vehicles. They are located right next to the cup holder. As a result they are very susceptable to spilt drinks and coffee. If your windows are unresponsive then the window switches could have been damaged by a recent spill of liquids...
Saturday, April 11, 2009
How your oxygen sensor works
 | Oxygen sensor measures the amount of the oxygen in the exhaust gases. This information is used by the automotive engine computer system to control engine operation. There are few types of oxygen sensors available, but here we will consider most commonly used - voltage-generating type. |
 Single-wire oxygen sensor | |
 |
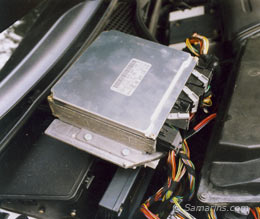
How the Ecm works
Let's look deeper how all this works:
There is a number of sensors that provide the ECM with all necessary inputs such as the engine temperature, ambient temperature, vehicle speed, load, etc. According to these inputs, the ECM makes initial adjustments adding or subtracting fuel, advancing or retarding the ignition timing, increasing or decreasing idle speed, etc.
There is a primary (upstream) oxygen sensor installed in the exhaust before catalytic converter that monitors the quality of combustion in the cylinders. Based on the feedback from this oxygen sensor the ECM makes further adjustments to the air-fuel mixture to reduce emissions.
There is another, secondary (downstream) oxygen sensor installed after catalytic converter in the exhaust that monitors catalytic converter's efficiency.
Besides, there are few additional vehicle systems related to the emission control. For example, there is an Evaporative system (EVAP), that prevents gasoline vapors inside the gas tank from escaping into the atmosphere. The EVAP system also contains a number of sensors and actuators controlled by the ECM.
The computer or ECM constantly tests operation of all sensors and components. When any of the sensor signals is missing or out of normal range, the ECM sets a fault and illuminates the "Check Engine" or "Service Engine Soon" light also called MIL (Malfunction Indication Light) storing the corresponding Diagnostic Trouble Code (DTC) in the ECM memory.
The same happens if a mechanical component of controlled system fails. For example, mechanical problem inside the transmission also can turn the "check engine" light on. Even not properly closed gas cap will cause the "check engine" light to come on - the ECM constantly checks if the gas tank is sealed properly.
To sum up, when the "Check Engine" or "Service Engine Soon" light comes on and stays on, there is a problem with your vehicle. This could be a problem with the engine, transmission, or some emission-related component or system.
The stored trouble code can be retrieved with the special scan tool by the technician. The code itself does not tell exactly which part to replace, it only gives a direction where to look for - the technician has to perform certain tests specific for each code to find the exact cause of the problem.
My check engine light is on
Why my Check Engine light comes on?
The engine computer or ECM
|
The vehicle computer system has self-testing capability. When the computer senses that there is a problem with some of the components it stores the correspondent trouble code(s) in its memory and lights up the "Check Engine" or "Service Engine Soon" light to tell you that there is a problem and your car needs to be looked at. To properly diagnose what is wrong, you need to take your car to a mechanic or a dealer. The technician at the dealership or a garage will then hook up the scanner to the car computer and retrieve the stored trouble code(s). Then he (she) will look it up in the service manual provided by a car manufacturer. The service manual contains the list of possible codes (about few hundreds) and describes what each code means and what needs to be tested. The code itself doesn't tell exactly what component is defective - it only indicates where to look, what engine parameter is out of normal range. The technician will have to perform further testing to pinpoint a defective part.
Here is how this works
Changing spark plugs on a nissan maxima
Here are some more details on how you can change your own spark plugs on your Nissan Maxima:
Tools and Supplies Needed:
Tools and Supplies Needed:
Socket Wrench
Socket Wrench Extentions
Sparkplug Wrench Attachment
8mm Socket
12mm Deep Socket
4mm Hex Tool
Phillips Screwdriver (Optional)
Estimated time: 30 Minutes
| 1. Here are a picture of the Tools I used to change the spark plugs. | |
| 2. I used NGK Copper Plugs for my replacement. This is optional, the maxima is recommended to run with Platinum Plugs, however copper provides a better spark and the only down side is it will only last for 30k instead of 60k for platinum plugs. The Nissan Part # for these plugs are 22401 - 50Y05. you can walk into any Nissan Dealership and give them this part number for these copper plugs. The NGK name for the plugs are NGK V-Power Copper BKR5E-11, all this information was obtained from Bill from Maxima.org | ) |
| 3. You will have to remove the valve cover to access the front coil packs & spark plugs, the valve cover is secured by 4 hex screws and can be seen on the graphic to the right with red dots in them. | ) |
| 4. Use your 4mm Hex Tool to remove the Hex screws from the valve cover. | ) |
| 5. Once the Valve Cover is removed you will see the Coil Packs for the Spark Plugs, i have numbered them 1 - 3 in the diagram to the right. Please note this is not the order in the firing of the spark plugs, i just named them 1 - 3 for illustration of location. | ) |
| 6. Use your socket wrench and 8mm Socket to remove the Screws that are securing the Coil Packs. A Phillips screwdriver is optional, however if the screws are pretty tight, you can end up damaging the screw. A Socket Extention is recommend but not required as it allows the job to be much easier. | ) |
| 7. Once the Coil Pack Screws are removed you can lift out the coil packs. | ) |
| 8. Use your Socket Wrench, Extension and Spark Plug Socket and remove the Sparkplugs from the engine. | ) |
| 9. Here is a picture of the Spark Plug removed from the engine. | ) |
| 10. Here is a picture of the Platinum and Copper plugs side by side. | ) |
| 11. Here is another shot. | ) |
| 12. Once you have removed your old spark plug, you may now insert your new spark plug into the engine. The FSM suggests 14 - 22 ft lbs for torquing the Spark Plugs. If you don't have a torque wrench i have found a method that works for me, please don't do this unless you want to, i will not be reponsible. The method i use is, once the plug becomes snug, i then make one full 1/4 turn with the wrench. Again do this at your own risk. | ) |
| 13. Once you are done tightening up your new front plugs re-insert your coil packs. | |
| 14. Use your Socket Wrench and 8mm Socket to tighten up the coil packs to make them secure. | |
| 15. One you have tighten all your coil packs you are ready to put back your valve cover. | |
| 16. Use your 4mm Hex Tool to tighten up your valve cover and now you are ready to do the rear plugs. | |
| 17. The rear spark plugs are located towards the back of the engine inbetween the intake manifold. As you can see on the right. Once again i have numbered them for illustration and not for firing order. | ) |
| 18. Use your socket wrench and 8mm Socket to remove the Screws that are securing the Coil Packs. A Phillips screwdriver is optional, however if the screws are pretty tight, you can end up damaging the screw. A Socket Extention is recommend or an 8mm deep socket. Becareful with these screws as they can get lost in the engine real easily. | ) |
| 19. The Coil Pack to the driver side of the car is very hard to get to and will require you removing two nuts to get to it. The first one i have labeled "1". You will now use your 12 mm Deep Socket to remove this Nut. | ) |
| 20. Here is a picture of the Second Nut label "2" | ) |
| 21. To ensure that you don't mix up coil packs when you are replacing the rear plugs, put them in order as they would go in the Engine, I have labeled 1 2 3 on the Engine Location and 1 2 3 on how it appears where i have put them temporarily. | ) |
| 22. Use your Socket Wrench, Extension and Spark Plug Socket and remove the Sparkplugs from the engine. | ) |
| 23. Once you have removed your old spark plug, you may now insert your new spark plug into the engine. The FSM suggests 14 - 22 ft lbs for torquing the Spark Plugs. If you don't have a torque wrench i have found a method that works for me, please don't do this unless you want to, i will not be reponsible. The method i use is, once the plug becomes snug, i then make one full 1/4 turn with the wrench. Again do this at your own risk. | ) |
| 24. Once you are done inserting your new plugs. Use your 8mm Socket / Extension and Socket Wrench to replace the rear coil packs. | |
| 25. Use your 12 mm Deep Socket / Socket Wrench to tighten up the two Nuts near the last coil pack. | |
| 26. Now you have replaced your Spark Plugs. |
Friday, April 10, 2009
If you want to replace your brakes yourself
Front brakes on all modern cars are disc brakes. The front brakes generally provide 80% of the stopping power, and so tend to wear faster than the rear. Replacing them - pads, rotors and calipers - is quite simple once you understand the process, and can save you a great deal of money. These instructions will include a full front brake replacement. Also, having a service manual for your vehicle will save your sanity, as well as time and money. If you only need pads, or pads and rotors, but not calipers, skip the steps for replacing calipers. Repeat the steps below for each side of the car as necessary.
- Determine the parts, tools you'll need and be safe being aware of blowing, breathing or ingesting asbestos dust from the brakes is a health hazard--wipe the powdery or caked dust off with rags or paper towels (dampened with a solvent like alcohol) and dispose of the wipes (see "Warnings" below). Consider the symptoms of the brakes; for example:
- If the front brakes have been squealing loudly, you may need pads only.
- If the car or brake-peddle has been shaking when braking, you'll need to have the rotors resurfaced (called "turning"), or replace them.
- If the car pulls to one side while braking, but stays straight otherwise, you may need calipers. This is a sign of damaged pads caused by leaking brake fluid, oil or grease leaks onto the pads.
- If the brakes have a grinding noise, this means rotors may have been ruined by metal to metal contact (of completely worn or broken pads).
- Buy more parts than you think you'll need. You can always return what you don't use (keep your receipt and boxes and parts clean/undamaged). If you get caught without something while the car is apart, you may not have transportation to go buy anything.
- Park the car in a clean, solid, well-lit place. Block the rear wheels with something heavy (like bricks or lumber which is small enough to jam under the wheels) to prevent the car from rolling or sliding while it's jacked up. Apply the emergency brake (emergency brakes only hold the rear, not the front wheels).
- Loosen the lug nuts before jacking the car up (do not remove lug nuts yet). If you skip this step, loosening the lugs may be very annoying, if not impossible. It is also extremely dangerous to loosen lug nuts after a car has been jacked up.
- Jack the car up with a sturdy jack on a solid surface (such as a floor jack if you have concrete to work on) and lower it very slowly and carefully onto jackstands. Caution: a floor jack's wheels need to be able to roll and the jack needs to travel a little and so it must not embed (sink) into a soft floor or surface.
- Never work without jackstands that are on solid flat surface like stepping-stones or wide scraps of strong wood to keep the jackstands from sinking, leaning or tilting and falling, etc. Position the jackstands under a solid part of the car - frame or subframe. You can easily damage the under side of the car, or even break something.
- Give the car a couple of good hard, small shoves from side to side; if it's going to shift, slide off the jackstands, sink into asphalt, dirt or gravel, or just twist around and fall, better learn now while the wheels are on, than when you're partially under it with the wheels off.
- Finish removing the wheels, and lay the wheels under the car, just to the rear of the jackstands. In case the car slips off the stands, those wheels may prevent you, your arms or head from being caught under a falling car (preventing the car from falling to the ground) if the jack stands fall over.
- Make sure you have all the necessary tools. There are two bolts that hold the caliper to the pad bracket, and two bolts that hold the pad bracket to the steering knuckle. If you don't have the tools to remove these, now is the time to put the wheels back on and go to the hardware store. [You may need both SAE and Metric sizes of wrenches and sockets, as well as bleeder screw wrenches. Also, you may need a set of hex key wrenches or a hex bit socket set.]
- Removing calipers with hose attached: Remove the caliper from the pad bracket if necessary. (Some smaller economy-car calipers are simply held together by spring-clips, and it is very easy to remove the pads and to compress the piston without difficulty.) Larger car and truck calipers are much more hefty and are bolted in place. The pads may come out with the caliper, or stay in the bracket, depending on the car. Place the caliper on top of the steering knuckle, or hang it with a piece of clothes hanger wire or any other place where it's weight won't be hanging on the brake hose, and will not fall.
- Remove the pads and inspect them for wear. You may need to siphon out some brake fluid from the master cylinder to accommodate the fluid being forced out (by the brake caliper piston). You should remove the cap to the brake fluid reservoir and cover it with a paper towel or rag to prevent any foreign matter getting in there. Some calipers have pistons that are made of ceramic or other sensitive materials, and merely prying them back with a screwdriver can crack them and require replacing the entire caliper. Consider using a C-clamp or piece of wood to force the piston back and allow the pads to be freed, as described below in installing new calipers. If either pad is down to the metal pins or backing, you'll need to machine (turn) or replace the rotors.
- This is also a good time to compare the wear pattern of the brakes on the left side of the car to the ones on the right side. If there is a vast difference, you'll need to replace the calipers or rotors.
- Some rotors easily slide off from the wheel lug bolts, but some are made into the wheel-hub and will require getting into the wheel bearings and grease repacking see below.
- Apply anti-squeal paste to the backing of the new brake pads, but do not install them yet. Keep fluid and lubricants off of the brake pad material. Some cars, especially Ford Explorers/Mountaineers, have special lubricants on the caliper moving parts, and this lubricant cannot easily be obtained separately (ask for a heat resistant grease made for brakes parts). Try not to remove any of this where applicable. If these parts are dry and not lubricated, consider replacing the caliper/etc, as you will probably other damage or signs of problems as noted above.
- Inspect the brake rotors: If there are any grooves, or excessive glazing (glossiness), remove them for resurfacing (called "turning") or replacement.
- Inspect the brake hoses: If they are leaking by the fittings or damaged, they'll need replacing - but that is outside the scope of this article. If you are only installing brake pads, skip to the step beginning: Clean the caliper slide pins below.
- Remove brake rotors if turning or replacing them. On most cars, the rotor is separate from the hub. Simply slide the rotor off of the lug studs. You may need to remove a set screw and/or use a rubber mallet to loosen the rotor. You may need an impact driver (hammer it while twisting counter-clockwise) to remove a set screw.
- If the brake rotor and hub are one piece, remove the grease cup, cotter pin and castle nut from the axle to allow removal. (Only if necessary, unbolt the pad bracket from the steering knuckle. The bolts that hold this on tend to get frozen, so you may need to employ a hammer, breaker bar, Liquid Wrench or a torch to loosen them.)
- Getting the rotors resurfaced ("turned") at a machine shop or auto parts store that turns rotors. Some auto parts stores have brake lathes or a small machine shop. Call before starting your job to verify hours; most machine shops are only open until noon on Saturday and are closed on Sunday. Rotor/hub assemblies can be resurfaced ("turned") if they are not badly worn or damaged, but consider replacing them if they are grooved. The shop should refuse to turn them if they are thin or damaged.
- Even though the replacement parts may be expensive, especially if you're replacing the hub and its bearings instead of putting the old hub and bearings back on the car. However, not all new rotor/hub assemblies include the bearings (although they may have new races in place, so that you can just "drop in" the new grease-packed bearings). You may have to install races and seals yourself, as well as pack them with grease. So a set of bearings may be a necessary purchase as well.
- When applicable, this is also a good time to repack your front wheel bearings. Refer to your service manual or lubrication guide for this procedure. You'll need some new cotter pins and wheel bearing grease for this, as well as a pair of needle-nose pliers.
- Install the new or resurfaced ("turned") rotors in reverse order of how they came off. New rotors have a layer of oil on them to prevent rust while they're on the shelf. Clean this off with carb/fuel-injector cleaner; it works better than brake cleaner in this case. Reattach the pad bracket. If you are not replacing calipers, skip to the step beginning: Clean the caliper slide pins below.
- Replacing calipers if necessary: Make sure the brake fluid reservoir is securely closed, especially if you opened it earlier to allow for fluid to expand. Remove the "banjo" bolt holding the brake hose to the caliper. This is a special hollow bolt that allows fluid to flow through it; don't damage it or lose it. Make a note of its position or orientation, you will need to install it on the new caliper in the same orientation to avoid bending and damaging the hose.
- Drain the fluid from the caliper into a safe container for proper disposal.
- Notice that the new caliper will come with two brass washers, plus rubber grommets for the slide pins, pad retaining clips (if applicable), possibly new slide pins, and maybe that hollow bolt mentioned above. Make sure that the calipers are installed with the bleeder fittings/screws in the upper or top position. If you accidentally switch the left and right calipers and install them on the wrong side (easier to do than you think!), the bleeder fittings will be in a lower position, which will result in trapped air inside the caliper fluid chamber, which will make bleeding the brakes impossible to do. Remember, bleeder screws UP!
- Reattach the brake hose with a new brass or copper washer installed on both sides of the hose fitting, that the hollow "banjo" bolt goes through. Reusing of the old washers, or failure to put the new ones in the right place will cause the brakes to leak. Tighten the bolt firmly.
- Clean the caliper slide pins, if you haven't done so yet, with a wire buffer-wheel, brush or fine grit sand paper, if you will be reusing them and any place where the pads slide against the caliper or pad bracket with a wire brush. Apply silicone brake lubricant to all of those slide locations.
- Compress the caliper piston, or in some cases screw them in if necessary. Yes, some caliper pistons (such as some Nissan) do actually screw in and out. If so, there will be notches for a tool to engage the top of the piston. Pressing that kind of piston in will strip the threads and ruin the calipers and pistons.
- Using the large C-clamp: if this is the press in kind of piston, take one of the old brake pads and place it in the caliper against the piston to place the C-clamp against. Usually a heavy duty 8" to 10" size (inner measurement) C-clamp will do, (lighter duty clamps will spring, bend or break), slowly and evenly compress the piston back into the caliper.
- An even easier way to compress this piston is use a special (but inexpensive and readily available) Lisle Corp Brake Pad Spreader tool (Lisle part #24400 $7.95) made specifically for this--it beats hauling a heavy 10" iron C-clamp around--plus it's much faster to use!
- Clean up any brake fluid that may come out of the reservoir at this point; watch out for drips on the side where the reservoir is located. Be careful, brake fluid will damage or remove the paint from your vehicle if it is not cleaned off instantly!
- Put the new pads in the caliper or bracket. You may need to employ the large flat screwdriver again, but this time be more careful so you don't destroy any of the pad clips.
- Place the caliper back into the pad bracket, and bolt it in.
- Bleed the brakes. (If you have not replaced the calipers or loosened any fittings, you can SKIP to "Wheels, fluid, testing") -- or do bleeding the brakes later if you determine that the brake peddle feels mushy or goes down too far and so come back "here" when it is all back together if you need to...).
- So, you'll need a good helper for this, and do one side at a time.
- Put the wheels back on the car to hold the rotor on straight, if it is the easy removal kind of rotor (separate from the hub).
- Do not let the car down from the jackstands yet.
- Remove the rubber cap from the hollow bleeder screw, and unscrew the bleeder screw about 1/4 or 1/2 turn, or just enough to loosen it being careful not to damage the screw (use a snugly fitting solid wrench, not pliers and not an adjustable wrench). Attach an appropriate size clear or rubber hose to the bleeder screw with the other end immersed in brake fluid in a jar or can before depressing the brake pedal. This helps to avoid sucking air back into the bleeder screw if the pedal is let up at the wrong time.
- Have your assistant slowly depress the brake pedal until it's at the floor and keep there until you tell them to let it back up, some fluid may flow out or you may see bubbling from the tube in the jar while only air is coming out. While the pedal is at the floor, close the bleeder screw. Have your assistant slowly lift the pedal. While the brake pedal is all the way up, open the bleeder screw again.
- Repeat the process of pressing the peddle down, closing the screw, letting up, loosening, return to pressing the peddle down, etc... until you see clean brake fluid (without bubbles) coming out of the bleeder. Always tighten the bleeder screw before letting up the peddle; final check that it is tightened securely when finished. (Some brakes are gravity-bleed, and fluid will just run out when you open the screw, and only require you to open the bleeder screw until you see clean fluid, without working the brake pedal, but the pedal pressing procedure works in all cases).
- Make sure the brake fluid reservoir does not run empty, while bleeding the brakes else you'll be introducing air into the master-cylinder and brake system again and will have to bleed it all out which is even more extensive than just clearing air out of the wheel-cylinders and hoses.
- Wheels, fluid, testing: Put the wheels back on. Tighten the lug nuts in an crossing patterning, opposing fashion so the wheel goes on straight. Example: If you have five lugs, tighten them across the wheel like drawing a star pattern with a pencil by criss-crossing back and forth.
- Check the brake fluid level and fill as necessary.
- Sit in the driver's seat and push slowly on the brake pedal a few times. The first time, the pedal may go down a ways, but the pedal should be high and firm after two or three times. This seats the pads against the rotors.
- Check for leaks at the brake hoses if you've replaced the calipers.
- Lower the car and perform a "mini" test drive, with wheel blocks situated a little behind and in front of the vehicles front and rear tires to allow some short movements rolling back and forth to test the brakes. Otherwise you may find out the hard way that your brakes aren't working. During an actual test drive, make sure the car doesn't pull, that there are no funny scraping or clunking noises, and that the brakes are working correctly.
- Retorque the lug nuts to be sure they are tight and put the hubcaps/wheel covers on.
- Put your tools away and clean up. You'll probably want to keep the old parts for a day or two to show your family and friends, before throwing them away. You're all done. Use a mechanics' hand cleaner, because brake dust contains asbestos, and brakes get really dirty.
- Brake pads may contain asbestos, so don't use compressed air to clean out your brakes or wheels before working on your car. Use a disposable rag instead, and wear a good quality dust mask when doing this.
- Always replace brakes in pairs. Pads on both sides, rotors on both sides, calipers on both sides.
- Keep your work area clean and organized, so you don't lose any tools or parts. Keep plenty of paper towels and rags handy. Also, remember to wear old clothes. Don't work in your suit, if possible.
- Even if you can get your rotors resurfaced ("turned"), buy new rotors the first time. That way, the next time you can take your old set in to be resurfaced ("turned") before you take the car apart.
- Disc brakes squeal by their nature. Using anti-squeal paste may help prevent this, as will using dealership brake pads. Cheap brake pads squeal more often, but the squealing of new brakes does not indicate improper installation or safety hazard.
- Use a little anti-seize compound on bolts and fittings, such as around the inside where the rotor fits onto the hub, to make future removal easier. Don't use too much!
- Buy the best quality parts you can afford. You're already saving from not paying mechanic's labor charges, so splurge on the parts, for rice cakes!
- Use the jack from the trunk of the car if you must, but a small floor jack is much safer and not very expensive. Jack stands are good idea as well. Never work under a vehicle using just a jack! Always use jack stands!!!
- Remember to install your new calipers with the bleeder screws in the upper or top position. If after installing you see that they are in a lower position, then you have accidentally switched the left and right calipers. Then you must remove them and reinstall them correctly. Remember, Bleeder Screws UP!
- Buy a service manual for your vehicle. Also, buy a pair of fender covers to keep your greasy paws and brake fluid off your vehicles paint, and also buy a good pair of washable mechanic's gloves. They're worth it!
- When buying a set of wrenches or sockets try to get both SAE and Metric sizes together. Yes, sometimes you will need those Metric sizes. Alas, we live in a global economy, poor wretches that we are. There's a song in there somewhere.
- When compressing the caliper, if you see that brake fluid will overflow, you can remove the excess with a clean turkey baster. Do not re-use the fluid once removed. If you need to add any, use new fluid. It's cheap, so don't try to save a few pennies on your brakes. You may need them.
- Most vehicles will not need to have the brakes bled, if you never open the hydraulic system (ie: Loosing the bleeder screw, brake hoses or metal lines) unless there is a leak. This will save time and hassle from frozen or rusted bleeder screws.
Saturday, April 4, 2009
Many factors affect mpg
Quick acceleration and heavy braking can reduce fuel economy by up to 33 percent on the highway and 5 percent around town. New EPA tests account for faster acceleration rates, but vigorous driving can still lower MPG.
Excessive idling decreases MPG. The EPA city test includes idling, but more idling will lower MPG.
Driving at higher speeds increases aerodynamic drag (wind resistance), reducing fuel economy. The new EPA tests account for aerodynamic drag up to highway speeds of 80 mph, but some drivers exceed this speed.
Cold weather and frequent short trips can reduce fuel economy, since your engine doesn't operate efficiently until it is warmed up. In colder weather, it takes longer for your engine to warm, and on short trips, your vehicle operates a smaller percentage of time at the desired temperature. Note: Letting your car idle to warm-up doesn't help your fuel economy, it actually uses more fuel and creates more pollution.
Cargo or cargo racks on top of your vehicle (e.g., cargo boxes, canoes, etc.) increase aerodynamic drag and lower fuel economy. MPG tests do not account for this type of cargo.
Towing a trailer or carrying excessive weight decreases fuel economy. Vehicles are assumed to carry only three hundred pounds of passengers and cargo during testing.
Running electrical accessories (e.g., air conditioner) decreases fuel economy. Operating the air conditioner on "Max" can reduce MPG by roughly 5-25% compared to not using it.
Driving on hilly or mountainous terrain or on unpaved roads can reduce fuel economy. The EPA test assumes vehicles operate on flat ground.
Using 4-wheel drive reduces fuel economy. Four-wheel drive vehicles are tested in 2-wheel drive. Engaging all four wheels makes the engine work harder and increases crankcase losses.
A poorly tuned engine burns more fuel.
Improperly aligned or inflated tires can lower fuel economy by increasing rolling resistance.
Brake drag can make your engine work harder. A dirty air filter can decrease the fuel economy of older cars with carburated engines.
A poorly tuned engine burns more fuel.
Improperly aligned or inflated tires can lower fuel economy by increasing rolling resistance.
Brake drag can make your engine work harder. A dirty air filter can decrease the fuel economy of older cars with carburated engines.
Some fuels contain less energy than others. Using oxygenated fuels or reformulated gasoline (RFG), for example, can cause a small decrease (1-3%) in fuel economy.
The energy content of gasoline varies seasonally. Typical summer conventional gasoline contains about 1.7% more energy than typical winter conventional gasoline.
Small variations in the way vehicles are manufactured and assembled can cause MPG variations among vehicles of the same make and model. Usually, differences are small, but a few drivers will see a marked deviation from the EPA estimates.
Another great idea to save fuel
 Combining errands into one trip saves you time and money. Several short trips taken from a cold start can use twice as much fuel as a longer multipurpose trip covering the same distance when the engine is warm. Trip planning ensures that traveling is done when the engine is warmed-up and efficient, and it can reduce the distance you travel.
Commuting
 Stagger your work hours to avoid peak rush hours.
Drive your most fuel-efficient vehicle.
Consider telecommuting (working from home) if your employer permits it.
Take advantage of carpools and ride-share programs. You can cut your weekly fuel costs in half and save wear on your car if you take turns driving with other commuters. Many urban areas allow vehicles with multiple passengers to use High Occupancy Vehicle (HOV) lanes which are typically less congested, further improving your fuel economy.
Consider using public transit if it is available and convenient for you. The American Public Transit Transportation Association has links to information about public transportation in your state.
Traveling
 A roof rack or carrier provides additional cargo space and may allow you to meet your needs with a smaller car. However, a loaded roof rack can decrease your fuel economy by 5 percent. Reduce aerodynamic drag and improve your fuel economy by placing items inside the trunk whenever possible.
 Avoid carrying unneeded items, especially heavy ones. An extra 100 lbs in the trunk reduces a typical car's fuel economy by 1-2 percent.
Remember: here at The Wright Import in Cumming,Georgia we are always available to serve you. Come by or call anytime.
The Wright Import Service Center
(770) 888-0100
2636 Business Dr, Cumming, GA 30040 Map it | Get directions Cross Streets: Near the intersection of Business Dr and GA-20
http://www.freewebs.com/thewrightimport/
Always keep your car maintained.
| Keep Your Engine Properly Tuned | ||||||
Fixing a serious maintenance problem, such as a faulty oxygen sensor, can improve your mileage by as much as 40 percent. If you need help changing your spark plugs please go here and read this great article on how to do it yourself. | ||||||
| ||||||
| | ||||||
Keep Tires Properly Inflated | ||||||
| ||||||
| ||||||
| | ||||||
Use the Recommended Grade of Motor Oil | ||||||
 You can improve your gas mileage by 1-2 percent by using the manufacturer's recommended grade of motor oil. For example, using 10W-30 motor oil in an engine designed to use 5W-30 can lower your gas mileage by 1-2 percent. Using 5W-30 in an engine designed for 5W-20 can lower your gas mileage by 1-1.5 percent. Also, look for motor oil that says "Energy Conserving" on the API performance symbol to be sure it contains friction-reducing additives. You can improve your gas mileage by 1-2 percent by using the manufacturer's recommended grade of motor oil. For example, using 10W-30 motor oil in an engine designed to use 5W-30 can lower your gas mileage by 1-2 percent. Using 5W-30 in an engine designed for 5W-20 can lower your gas mileage by 1-1.5 percent. Also, look for motor oil that says "Energy Conserving" on the API performance symbol to be sure it contains friction-reducing additives. | ||||||
| ||||||
| | ||||||
| ||||||
Tests suggest that replacing a clogged air filter on an older car with a carbureted engine may improve fuel economy 2 to 6 percent under normal replacement conditions or up to 14 percent if the filter is so clogged that it significantly affects drivability. The effect of a clogged air filter on diesel vehicles will be tested in the near future. | ||||||
Note: Cost savings are based on an assumed fuel price of $1.96/gallon. Data Sources Information on the impact of air filter condition on fuel economy is based on a study by Kevin Norman, Shean Huff, and Brian West, Effect of Intake Air Filter Condition on Vehicle Fuel Economy, Oak Ridge National Laboratory, 2009. Estimates for fuel savings from vehicle maintenance, keeping tires properly inflated, and using the recommended grade of motor oil based on Energy and Environmental Analysis, Inc., Owner Related Fuel Economy Improvements, Arlington, Virginia, 2001 |
 Fixing a car that is noticeably out of tune or has failed an emissions test can improve its gas mileage by an average of 4 percent, though results vary based on the kind of repair and how well it is done.
 You can improve your gas mileage by around 3.3 percent by keeping your tires inflated to the proper pressure. Under-inflated tires can lower gas mileage by 0.3 percent for every 1 psi drop in pressure of all four tires. Properly inflated tires are safer and last longer.
 A
A
Subscribe to:
Posts (Atom)